
For any dental professional, taking an X-ray is a standard part of the job. But what happens after you press the button? The real skill lies in making the most of the image you get. Dental imaging is more than just a picture; it’s a powerful tool that helps you see what’s hidden beneath the surface. Using it well can change how you diagnose problems, plan treatments, and talk to your patients. This guide will help you use dental imaging to its full potential in your daily practice.
The Basics: Understanding Your Go-To Images
Every day, you rely on a few key types of dental X-rays. Knowing what each one is best for is the first step to a good diagnosis.
Periapical X-Rays
A periapical X-ray is a close-up picture of one tooth. It shows the whole tooth, including the part you see and the root hidden in the bone. You use it to check for infection, see if a root canal worked, or find other problems in the bone around a single tooth. It gives you a clear and detailed view of a small area.
Bitewing X-Rays
Bitewing X-rays are the best way to see what's happening between your patient’s back teeth. The name comes from the small tab the patient bites on to hold the film in place. These images are excellent for finding cavities in between teeth that you can’t see with your eyes alone. They also show how much bone is between the teeth, which is a key sign of gum disease. You should take bitewings regularly, usually once a year, as a standard check-up.
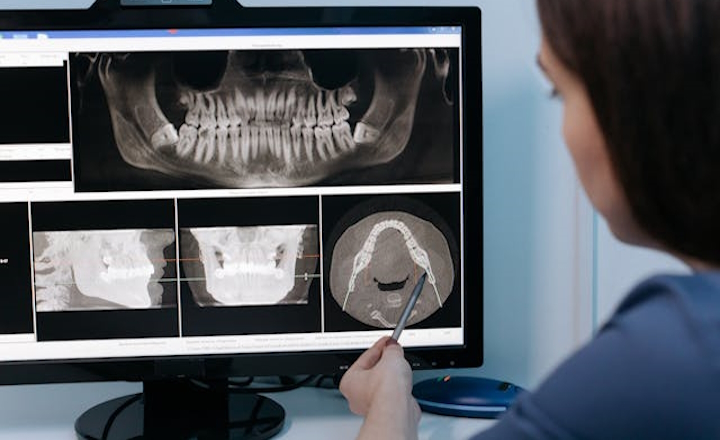
Panoramic X-Rays
A panoramic X-ray is one big picture that shows the entire mouth. It captures all the teeth on both the top and bottom jaws, the jaw bones, and the joints. You get a wider view with it, which is great for seeing things like impacted wisdom teeth, extra teeth, or missing teeth. It’s a great tool to get a full picture of a patient’s mouth and jaw health. However, since it shows such a wide area, it's not as sharp as other images for finding small cavities or root infections.
Seeing More with Advanced Imaging
While the basic X-rays are crucial, some situations require a more detailed view. This is where advanced imaging comes in.
CBCT (Cone Beam Computed Tomography)
For a three-dimensional view of the mouth, nothing beats a CBCT scan. This machine creates a digital model of the patient’s jaw, nerves, and teeth. It’s like having a physical model of the patient’s head that you can rotate and look at from any angle. A CBCT scan is a game-changer for several reasons:
Implant Planning: It helps you find the best spot to place a dental implant, making sure you don't hit any nerves or blood vessels.
Oral Surgery: You can use it to see the exact position of impacted teeth, like tricky wisdom teeth, which helps you plan a safer surgery.
Diagnosis: It can show you things that flat X-rays can't, like a hidden crack in a tooth or a problem in the bone that might be causing a patient pain.
Lateral Ceph X-Rays
When it comes to planning orthodontic treatment or oral surgery, a lateral cephalometric X-ray is one of the most important tools you can use. A lateral ceph is a side-view X-ray of the head. It shows the entire profile of the patient's skull, including the jaw, face, and teeth. The image helps you see the relationship between the upper and lower jaws and how the teeth fit together. By measuring different parts of the skull on this image, you can:
Track Growth: In young patients, a lateral ceph helps you see how the jaws are growing and how a treatment might affect that growth.
Plan Braces: It helps you decide the best way to move teeth and make sure the changes look good and are stable in the long run.
Prepare for Surgery: For complex cases that need jaw surgery, this image is vital for planning the exact movements of the bones. It gives you a clear map of the entire facial profile.
Making Imaging Part of Your Everyday Routine
Having the right tools is only half the battle. How you use them is what really makes a difference.
Take Great Images
A blurry, low-quality image is often useless. Always take a few seconds to make sure your patient is positioned correctly. Use the right settings on your machine and double-check the image after you take it. If it’s not clear, it’s always better to take a new one. A high-quality image saves you time and helps you make a better diagnosis.
Review Every Image Systematically
It’s easy to look at an X-ray just for the problem the patient came in with, like a toothache. But get into the habit of looking at every part of every image. Use a system:
1. Check the teeth for cavities and cracks.
2. Look at the bone around the teeth for any signs of bone loss or infection.
3. Check the roots of the teeth.
4. Finally, look at the jawbones and any other structures captured in the image. This method helps you find problems you weren’t even looking for.
Use Images as a Communication Tool
Show your patients their X-rays. Use the image to explain why they need a filling or a root canal. Point to the problem area on the screen and talk about it in simple terms. This helps patients understand their health and feel more involved in their treatment. It builds trust and makes them more likely to accept your treatment plan.
Conclusion
Dental imaging is a powerful part of a modern dental practice. By understanding the different types of images and using them to their full potential, you can improve how you diagnose problems and plan treatments. A well-chosen, high-quality image is your best friend in the dental office. It helps you find hidden issues, communicate clearly with your patients, and ultimately, provide the best care possible.